

With backyard barbecue season just around the corner, you’re probably looking for ways to spruce up your back patio. With just a small investment in some parts and tools, you can turn an old, broken refrigerator into an incredible outdoor bar cooler.
How To Turn An Old Fridge Into An Outdoor Bar
Do you have an old, broken refrigerator collecting dust in your shed or basement? Before you drag it out to the curb, check out these step-by-step instructions for how to turn that old, broken-down fridge into an outdoor bar cooler. The best part? It should only cost you about $40. If you don’t have an old fridge, you can find them for cheap on craigslist or Facebook Marketplace. (1)
What You Need
The following is a list of materials to make your outdoor bar cooler (1):
- Old refrigerator
- 4 wood pallets
- 1 ¼” wood screws
- Caulking
- Liquid nails
- Casters
- 2” x 4”s
- Misc PVC/Brass fittings
- Rope and eye bolts
- Black spray paint
To put the cooler together, you will need the following tools (1):
- Drill or driver
- Chop saw
- Circular saw
- Sander
- Caulking gun
- Pry bars
- Hammers
Once you have collected all the necessary materials and tools, you are now ready to begin building.

Read: People Are Making DIY Swimming Pools Out Of Hay Bales
Step 1: Break Down The Pallets
To break down your pallets, cut through the deck boards where they attach to the sideboards. From here, you should be able to hammer apart the pallets with relative ease. (1)
Step 2: Process The Pallet Wood
You want each of the boards from the pallet to be as long as the width of the refrigerator. This is likely about 25.75”; however, measure your fridge to be certain. Leave a few pieces uncut so that you can use them for trim later. (1)
Step 3: Take Apart The Fridge
To take apart your refrigerator, simply remove the (1):
- Screws
- Electronics
- Shelving
Be very careful, however, that you don’t cut the freon lines. Doing so will release freon gas into the atmosphere, which is actually illegal. (1)
Read: Woman Spends $4,000 Transforming Shipping Container Into An Unbelievable Home
Step 5: Paint
Though not necessary, this step can help make your outdoor bar cooler just that much classier. Paint the fridge black without worrying about it being perfect. Remember, most of the fridge will be covered by wood, but part of it will show, so you want that part to look nice. (1)
Step 6: Add The Wood Siding
You need to cover the top, sides, and bottom of the fridge with wood. Layout the pallets first before attaching them to make sure they all fit nicely. This step might take time as not each board will line up perfectly with the other. Once you are happy with your layout, use the screws and liquid nails to attach the boards to the fridge. Be sure not to puncture the inner cooler container part of the fridge. (1)
Step 7: Cover The Doors With Wood
The same rules apply for covering the doors of the fridge with wood, as do the sides. This might be a bit trickier to keep looking as nice as the walls; however, with patience and care, it is very achievable. You can then add trim boards to make it look extra good. (1)
Step 8: Build The Base
Build your base out of the 2”x4”s to provide support for the base of the cooler and act as a mounting for castings. (1)
Step 9: Make It Waterproof
Of course, you’re likely going to be filling your cooler with ice, cold drinks, and more. Fridges aren’t built to be waterproof when laying on their sides, so you will have to use caulking to seal all holes in the fridge. Some of the larger holes will require PVC plugs. (1)
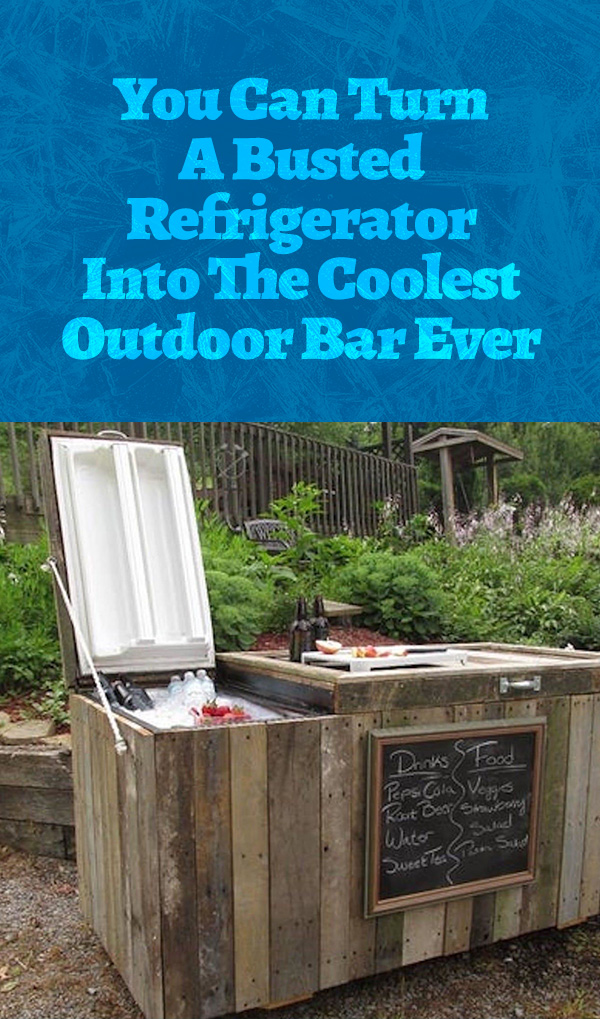
Step 10: Finishing Touches
Now that you have a functional cooler, you can add things like handles, chalkboard, rope door catches, etc to give it character and make it aesthetically pleasing. (1) Now, your outdoor bar cooler made of a busted old refrigerator is ready to wow your guests at your next backyard get-together.

For more detailed instructions and images check out Instructables.com
If you’re more of a video person, check these out. They aren’t they exact same plans, but they’re similar and should work for you as well!
Keep Reading:This DIY Backyard Guest House Can Can Be Built In 8 Hours
Sources
- “Awesome Rustic Cooler From Broken Refrigerator and Pallets.” Instructables. Matt Makes